Showing posts with label sewing. Show all posts

Wednesday, 22 October 2014

Autumn fashion....Yes Please!

I seem to be having a skirt fest at the moment!. Despite the fact that as a hands on nanny I spend most of my time grovelling on the floor, or leaping about like some mad woman playing on the wii and therefore am more likely to be in my jeans, I do like to wear skirts and dresses.
Over time my taste has gone from the tailored smart to the comfy casual, preferably with thick tights and boots!
My pattern of choice at the moment is the pencil skirt from Angela Kane. After downloading a couple of her free patterns, which I quite liked, I decided to sign up. Now for just £25 joining fee I can download as many patterns as I like. Since there are about 28 ( and new ones being added) I think, that's not bad value at all. One of the best things though is the you tube tutorials. Even as a fairly prolific sewer, I have learned some excellent tips and short cuts.


My first attempt....1991 curtain fabric! I love it and am tempted to make a coat too. I have enough material!!

 You only got the bottom of this photo 'cos I was pulling the most stupid face!


A lined wool tweed, and a close up of the back pleat which I much prefer for Autumn/Winter skirts, much less drafty!

I also made an unlined brushed moleskin with patch pockets, but I loved it so much its been worn and is now in the wash.

I have made another Ponti dress.....


I wouldn't have thought of wearing the mustard with orange, but couldn't be bothered to change. However since the scarf does have both colours in I might be tempted. At least its very Autumnul!

In between busily sewing cushions, bunting and Christmas decorations for our next Olive & Edna pop up shop, I have also downloaded a 1940s dungaree pattern which I hope to wear on the day.......


Saturday 15th November 2014

I'd better get a move on or I could be wearing them with the pins in still...not a good look and somewhat dangerous!

If you are in the area do pop in if only to say hello and taste the wonderful cakes!

TTFN
Jenny xx

Tuesday, 5 February 2013

BAG YOURSELF SOME VINTAGE STORAGE......A Tutorial....

Hi lovely sewers
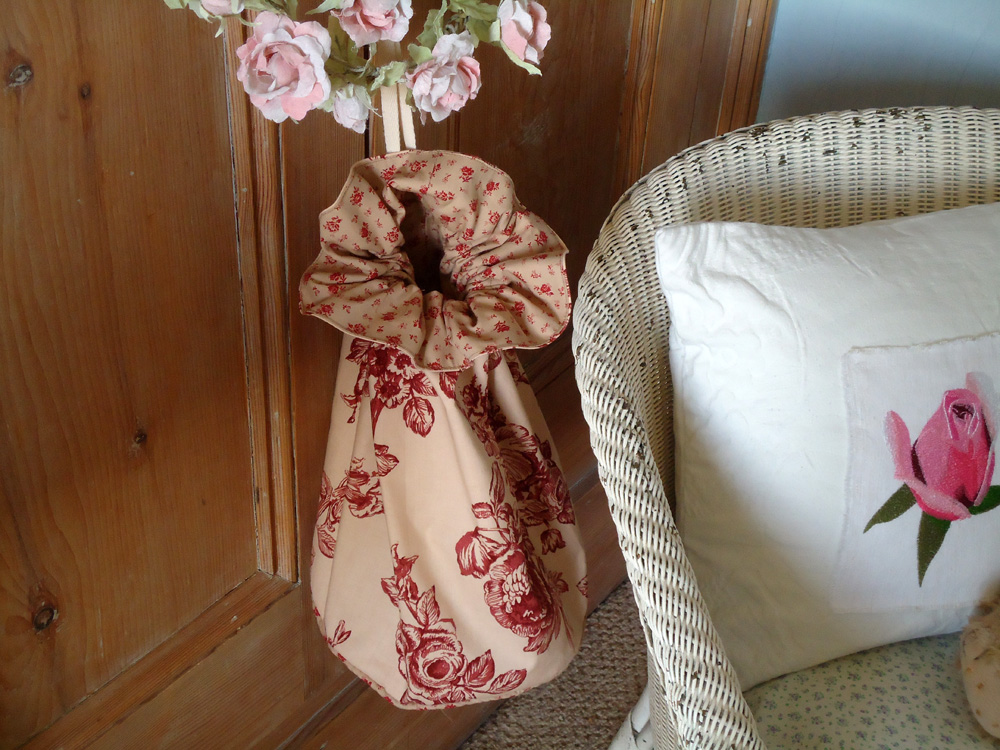
This week as well as churning out candy bunnies, I have been giving a bit of thought to the bedroom makeover. I have a walk in wardrobe, and in it storage baskets in a frame in which I keep all my lingerie and hose. However my socks and tights are fighting for space so I decided I could do with a drawstring bag to add to the storage and which could be hung decoratively on the built in cupboard doors.
So I chose a couple of pieces of the fabric I had already sorted as possibilities for the room, and set to.

This is how I did it....a little tutorial.....

You will need..

1/2 yard of cotton fabric, either medium furnishing weight or patchwork fabric for the outer layer
1/2 yard of a contrasting or toning cotton, similar weight. ( both about 45 inches wide ) for the lining.
3/4 yard to 1 yard  of piping cord.
1 yard cotton tape, ribbon or string.
Matching thread.


First find a template to draw a 10 inch circle. I could only find the base of a 9 inch cake tin so used that and added 1/2 inch all round for my seams. Starting at the edge of your fabric cut one circle out of each of your fabrics.
Cut a rectangle from each fabric 14 inches by 27 inches
Cut two strips from the lining fabric, one 28 inches by 1 1/2inches and the second 28 inches by 2 inches.


Take the 1 1/2 inch strip and fold in half along the length, wrong sides together. Take the piping cord and place it right up against the inside of the fold. Starting a couple of inches away from the end and using a zipper foot stitch as close as possible to the cord and continue to within 2 inches of the end of the cotton strip.


Take the circle cut from the outer fabric, and starting where your stitching began, carefully pin the corded strip around the outer edge of the circle keeping the cut edges matching. It is usual to have binding cut on the bias when using piping cord, but this does take rather a lot of fabric and as I was using some vintage fabric, I didn't want to waste any. For this project it worked OK, even though I did not snip into the curved seam, but I would not recommend this for anything on a bigger scale.
 

When you have pinned all around, again using the zipper foot carefully stitch the piped strip around the circle again starting and finishing where your original stitching on the tape began and ended. You should have a small amount that is not yet attached. This is where you cut the cord so that it meets flush and turn in one end of the tape and let it overlap the other end to give a neat join. Pin when done and finish stitching this portion.


Next take one of the rectangles and with right sides facing sew a half inch seam down the short sides, creating a tube. Do the same with the lining piece. Press the seams open.


Now you will join the outer tube to the already piped circle. With right sides facing pin the tube to the outer edge of the circle and again using your zipper foot stitch close to the piping.
Next with right sides facing join the lining tube to the lining circle in the same way, this time you need a 1/2 inch seam as there is no piping to sew against.


Having the outer bag piece inside out, and the lining bag piece the correct way, slide the lining inside the outer bag. The right sides should now be facing and the top of the bag pieces level.. Stitch around the top with a 1/2 inch seam leaving about 4 inches unsewn to turn the bag right sides out.  Pull both parts of the bag through this gap and then push the lining down inside the outer bag and press the top edge before top stitching all around closing the gap as you do.


Take the remaining 2 inch strip and fold it in half lengthwise with the right sides facing. Stitch the long edge with a 1/4 inch seam. Fasten both ends of your stitching securely as you will now turn this tube right side out. Press the tube with the seam centred at the back. Turn one short end in and neaten with hand stitching.


Now mark a line on the outer bag about 2 inches from the top all around. This is the placement line for the  casing you have just made. Pin the top of the casing under this line starting with the neatened edge about 1/4 inch away from the back seam, and finish the same distance from the other side, if necessary cut the casing to fit allowing about 1/4 inch to tuck in and neaten as you did at the beginning. Attach the casing by stitching close to both the top and bottom edges ensuring that you secure it well at both the start and end on each row of stitching as this is where you will thread your ribbon or tape to draw the bag closed.


Finally thread your tape through the casing and then either knot or neaten the ends before knotting them together and voila....


one useful drawstring bag for all manner of things....hosiery, hair equipment, face cloths in a bathroom...the uses are endless and the look too depending on your fabric choice. You could even use lightweight velvet and store your jewellery, or use fun 50s nursery prints and use as pyjama cases.

I would love to see your versions if you decide to have a go......

Must be wine o'clock by now so will bid you all goodnight and happy sewing.

TTFN
Jenny xx


Wednesday, 17 October 2012

COSY HEADBAND....A Tutorial

Hi fellow sewers and perhaps some who would like to be. Here is the tutorial I promised for the Cosy Fleece Headband. If like me you enjoy walking, particularly in the Autumn and Winter, and I know from some of the lovely blogs I read that many of you do: and if like me you look a right dork in any kind of pull on hat but hate your ears to turn to ice, then this is the tutorial for you (Not that I am implying any of you look like dorks...ever  lol)

Cosy Fleece Headband

First gather your materials and tools


1.  Printable pattern below (hopefully)
2. 1/4 metre of 54 inch or 60 inch wide fleece. (If you also want to make a matching scarf make this 1/2 metre)
3. 2 metres of bi -fold elastic. (I got mine from an Internet lingerie site, available in masses of colours)
4. 4 inches of hook and loop fastener
5. Scissors
6. Pins
7.Sewing machine

First you will need to make a pattern. I hope the following image will print off for you. It should be printed out twice on A4 sheets and when cut out joined together flush with sellotape where indicated. I tend to use thin card but paper will do.

Headband Pattern Signed

Next take your fleece and fold in half width ways. Place the full pattern on one straight edge and weight down with paperweights tins of beans or anything fairly heavy that you can work around. I do this as to try to pin through the pattern and the double fleece can distort the shape you are trying to cut.


Draw around the pattern with tailors chalk and when done remove the weights and pin through both layers of fleece before cutting out.
 Sew around the headband as close to the edge as you can with a medium running stitch, to hold the 2 layers together.


Next you need to bind the cut edges of the headband with the by-fold elastic. Starting at the bottom (the wavy edge) sew one edge of the elastic as close as possible to the running stitch you have just sewn around the headband. Leave a tail of about 1/2 inch at the beginning.


When you approach a corner stop about 1/2 inch away and then hold the elastic in place at the corner, preferably with the middle finger


Pull the elastic around the corner and hold it in place with the index finger or whichever is easiest for you..

Using the other hand to guide the work slowly continue sewing around the  corner. Not easy but practice makes perfect (or only nearly so in my case)

When you have sewn the elastic all the way round you should overlap the short tail you left at the start and then trim this level.


 Don't worry it will spring back and look as if you didn't cut it straight but that will be hidden in the next step.
This will be the underside of the headband now.
Next you need to turn the band over and bring the elastic over the edge and secure with an elastic stitch if you have it on your machine...No 6 on mine, but if you don't have this a zig zag will do.


First though you need to make the joined corner neat. Fold the elastic at the bottom edge over to the front just at that corner and pin, and then carefully fold the side of the elastic over to neatly encase the raw edges.


Using the elastic or zig zag stitch pull the elastic over to the right side and attach all around.When you start it is a good idea to do a couple of stitches and then hold the top and shuttle threads to slightly ease the fabric under the machine foot. You should find that it curls quite naturally at the corners, but if it won't stretch neatly in place trim a little off the fleece here to allow it to sit flat.


The finished band should now look something like this. All you need now is to sew on the hook and loop fastener. I use two strips to give more adjustment and strength. With the right side of the headband facing down fold the side near your left hand over to the middle. The loop portions of your fastener should be sewn on the right side (now facing you) near to the finished edge here. The hook portions should be sewn to the wrong side at the other edge.


Your headband is now complete.  The fastening sits at the back of the head so that the curved portions cover the ears. Of course you can leave it plain....or dress it up a little


and voila the hair once the band is removed still looks decent enough to pop into that country inn for Sunday lunch..


I hope this will be a little project that you enjoy. I know there will be many much more experienced sewers who will have a better way of attaching the elastic. On thinner fabrics I merely tuck the raw edges straight into the folded elastic but I find the bulky fleece is not easy to handle in this way. However if anyone has any tips to make it easier still I am all ears.

Now I know this post is quite long and so I will save the scarf details for next time. 

If you have any problem printing the pattern: download, open and then print the PDF let me know with an email address and I will try to forward a copy to you from which you can print it. I have tried to find out about attaching printables to my blog but so far this has been the only way I have managed to do it. Thank you to those that have offered advise, I have tried your suggestions to no avail. If anyone else knows a better solution I would love to hear.

Happy sewing
Jenny xx


Monday, 3 October 2011

AND SO WHAT HAVE YOU ALL BEEN DOING............

Well...................as for me it has really been a mixed bag....

First I did a bit of sewing.....old skirts getting a bit snug!!............


Burda pattern 8213, great now that they include seam allowances, used to hate it when you had to mark your own, 'cos it doesn't matter how experienced you are, they never seem (sorry) to end up exactly the same width!!  I only made this out of cheap cotton (£3.99 a metre) as I wanted one in a hurry, but had forgotten how much I like this style so am going to make a couple more in needle cord for the winter. (That's next week according to the weather forecast!)

Then I had a birthday, and was spoiled rotten as usual......................


Books, DVDs and quirky collectibles, what more could I ask for.......Thank you to my lovely family and friend, how well they know me......the cute Tea Cosy and the Kindle Cover were found by my DD on the Internet....she always manages to discover something really different. Don't get me wrong I love everything, some things were on my wish list and others were a lovely surprise.

And finally a visit to the Antique Festival at the Peterborough showground last Saturday...... I can honestly say I ran out of money before I ran out of things I would have liked to buy! Still I am very lucky to have been able to add all these gems to my collections...including more babycham pieces paid for by my DH, even though he had just spent plenty on me for my birthday......


Couldn't resist the Peter Rabbit picture, not only is Beatrix Potter one of my favourites, but to have him advertising slippers...well there was no choice, in my sewing room it will go....


So do I count my blessings....I certainly do, and not just the lovely gifts, but all the love with which they are chosen and given......in that respect I am truly a millionaire......

I know I did say finally, but there is a bit more....as you will know if you read this waffle regularly, we have just had some windows replaced at the back of our house...well, although it certainly wasn't planned yet, we have now started redecorating the kitchen, and since my cupboards are all free standing and hand painted, we have given ourselves quite a task......but we are half way there now!!....and it will be nice for Christmas......hopefully !

Off now to catch up with a few of your blogs, while I have a spare evening. I was supposed to be adding some new slippers to my shops, but who forgot to take the photographs in all this beautiful sunshine....You watch it will be really overcast tomorrow....

TTFN
Jenny xx

Wednesday, 13 October 2010

OCTOBER GEMS..

No not the sparkly sort.....

...the ones that make you really appreciate your lot.....A beautiful afternoon spent with good company (DH and grandson) enjoying the marvellous scenery and mother natures treasures.....


Rutland water...


...people messing about in boats....


....exploring the woodland paths...


....man and boy in perfect harmony...

...then the spoils of an unexpected car boot sale....still carrying on until the weather breaks.....


Ok so its only repro..but it will look great in my kitchen....

...............and the best find of all.........


I already have one of these but without the box, and I have to say that it is the box which appeals to me the most...I just love the illustrations, It will look great in my sewing room!  I think I might have to take the other one to a little antique and collectors fair that my SIL and I are doing at Lincoln showground in December..

Well lets hope the rest of the month proves as pleasurable as these first few days. We are off to Gloucester at the weekend. Never been before so hoping for a good rummage.
The new coat is almost finished so should be able to give you a peek in a day or two, hoping to take it with me, so I'd better get it done!!

Finally I have been very honoured to be passed the 'versatile blogger' award by Amy at Blighty Boutique.


I am very flattered but I am supposed to tell you seven interesting facts about me........well I will be honest and say I did this once before and can't for the life of me think of anything else at the moment, so I am going to think about this a bit longer.  I should also pass it on to 5 other lovely bloggers, but there are so many of you that deserve it far more than me that I hate to leave anyone out, so am not going to do this either.
I do hope Amy will forgive me and still read my blog!

Well that really is all for now, its getting very late again..

TTFN
Jenny xx