Showing posts with label Tutorial. Show all posts

Wednesday, 25 January 2017

In a Crazy World at least my ears are warm!....and a giveaway!!

Yes the world has gone crazy, and yes there are some very important issues out there, but we all have to deal with this in our own way. I have two favourite options for this. One, turn off the TV and radio and avoid the Internet ,or two, immerse myself in something I love and hope that some of the awful panic starts to fade.
It's not any kind of solution but it's my way!

And so naturally since I can't just avoid everything I dislike I've decided to embrace number two and hit my sewing room...again.
I completed the sweat shirts for the grandsons and am currently deciding on my next bigger project, but it is sooooooo cold here it's enough to freeze, well just about anything really!
So I thought I would share my favourite headband, earmuff tutorial with you.

You will need:
About 6 inches, (15 cms) x the circumference of your head measured  around your ears plus 4 inches, (10 cms) of fleece.
A small amount of polyester filling. The band is slightly padded for extra warmth and it is a little more flattering
About 4-5 inches (8-10 cms) of Velcro, hook and loop fastener.
Matching thread
Sewing machine, although this project is small enough to be hand sewn if you don't have access to one.
Card or paper to make template.

First of all measure around your head, or your child's as this is suitable for all sizes, going over your ears. Make a note of this measurement.


Next you will need to make a pattern.Take a piece of card or firm paper half your original measurement plus about 1.5 inches (3 cms) and about 6 inches (15 cms) wide. A4 paper was just the 1.5 inches short for my head, so I used this and noted my pattern piece to add that on to the back measurement when cutting out.
First draw a line 4 inches,( 10 cms) down from one long edge.


Next measure from the centre front of your head to the centre of your ears. This is the second measurement. Jot it down.

One short edge of the card will be your centre front. Mark this. Measure along the  long edge from the centre front and mark the second measurement (centre of ear).Mark this again from the centre front along the drawn line. Connect the two marks and draw a vertical line.


Next you will need something rounded to create the slight shaping to cover the ears. I had the backing  ring from some bias tape. Place the bottom of the circle or saucer, whatever you are using so that it is centred over the second measurement line and comes below the bottom line of the band by about 3/8 inch (1 cm) . Draw the curve and then blend that into the bottom line so that it is a gentle dip as opposed to a deep curved flap. This is then your template which is half your band. As I was using fleece and I find cutting it on a fold rather tricky, I copied the template onto another piece of card and joined the two together at the centre front with sellotape. This is also a good way to check you have measured correctly and that the slight dips line up with your ears!


You will need to cut two of these out of fleece, not forgetting to add the extra length at the back seam  if like me your card was shorter than needed, and then right sides together pin and stitch them together leaving a small gap on the bottom edge to turn the band out.


Trim the corners, making sure you don't cut the stitching and layer the seams, that is trim one side to about an eighth of an inch to reduce bulk, then turn out to the right side.


With the bottom shaped edge towards you fold the left side over to the middle and the bring the right side over to overlap this.


The overlapped side should be the one that is completely sewn, the side with the opening still is the one underneath at this point.
You will now stitch the hook portions of the hook and loop fastener to the underside of the right overlapped piece. Cut two pieces about 1/2 inch less than the finished width of your band and centre them side by side.


This is the point at which you will insert the stuffing. You are aiming for an even flat slightly padded look, so you don't need too much.You should keep the stuffing about  two inches, 5 cms away from the end which is still open as you will be stitching the loop part of the fastener here. Its a little tricky with the opening but not impossible. You could use thin batting that you would use in quilting, but this would need to be attached when sewing the band together and I thought this might prove a little tricky with the thickness of the fleece.
Once you are happy with the look of your band close the opening neatly with a ladder or similar stitch. There are lots of videos on the web showing the neatest way to do this.
Ease any stuffing away from the end to leave you about two inches to work on and then you will finish by sewing on the loop fastener.
To ensure that you are sewing it on the correct side fold your band as before, with the shaped side towards you fold in the left side to the middle and then the right side to overlap this. If you have it folded correctly the hook part of the fastener will be on the underside of the right overlapped piece. You will then sew the loop part on the end of the left side facing up.


And you are done, A cosy band to keep head and ears warm.


Dress it up with a vintage brooch or even make some felt flowers to add a bit of fun. Why not make several to go with your different outfits! If unlike me you don't have a ready supply of fleece there are sellers on eBay who sell scarf sized remnants of fleece that would be perfect, or you can recycle an old fleece of your own or from a charity shop.

Do let me know if you have a go, I would love to see some of your creations.

Here are a few I made earlier, I hope they might give you some inspiration.


And finally if you want to have a go I have quite a quantity of fleece in basic colours, beige, navy, dark brown and black left over from my slipper making. I will send a piece of your choice to the first 6 people to leave a comment here and there might be a little surprise gift included too.

Good luck

TTFN
Jenny xx

PS I will keep the give away open until 31/01/17 and then contact the winners for their addresses.

Friday, 28 November 2014

Beautiful adjustable hair bands - A Tutorial

So Christmas is nearly here and as well as the frantic shopping and cooking most of us will also be turning our thoughts to what to wear! Of course if you have little princesses the task is even harder as they seem to get fashion savvy at a much younger age nowadays.
One of the things I have noticed though is the number of young ladies (and older ones too) who favour wearing decorated hair bands, and as I make a few to sell I thought I would share how to make your own from a small length of soft elastic, a discarded bra, and a small scrap of fabric.

Materials.


 24 inches/ 60 cms of soft elastic in the colour of your choice.
I buy mine on line and the bi-fold elastic works a treat and only costs pennies a metre.

One loop and one slider from an old bra.
If it's the wrong colour you can either spray it or paint it with nail polish. Use tweezers to hold the small parts to colour them. If you are lucky to find clear ones these are even better.

Fabric of your choice torn in a 2 inch strip. The length will determine how full the rose is. I just tore a strip across the width of my fabric.


Method

First make your flower.
Take the fabric strip and fold in half with the right side of the fabric on the outside.


 At one end take the corner of the folded edge and bring it down to the torn edge. You will have formed a small triangle.

 If you have a hot glue gun put a tiny dab if glue at the bottom to hold in place. If using a needle and matching thread make a couple of small stitches here to hold the base of the triangle in place.
Next you are going to roll your strip a couple of times tightly to create the flower centre. Again you will need a spot of glue  or a stitch at the base to hold the centre in place.

Now you are going to twist the fabric strip about twice and then turning the flower in your hand glue or stitch the fabric around the base to create a rose shape.

This may seem fiddly and you are probably wise to practice with a spare bit of fabric first, but you will soon get the feel for it.
Once you reach the end of the strip, fold it down again as you did in the beginning making a neat triangle with the end and finally securing it to the base of your flower.
If you want a more open bloom, make the twists looser, if you prefer a tight looking rose keep the twists firm and even. The secret is to keep checking that you are securing the 'petals' or folds to the base with each twist so that the flower does not unravel.
Of course this is only one type of flower, you could make one from layers of felt petals, or my favourite a melted rose made from synthetic taffetas,organza and even dress linings.
If any one would like a tutorial for my take on these, just let me know in the comments.

Next the band. Now this is the bit I love because the band is adjustable and is therefore suitable for babies, through to children and even adults.One size fits all!
First you need to thread about one inch of one end of your elastic through the rescued bra strap loop and sew or glue in place.

 I use a glue called Fabri-tac and it sticks firmly and permanently in minutes,

 but you can easily stitch instead by hand or machine. Keep this join facing you for the next step as shown in the photograph.
Next you need to thread the other end through the slider keeping the elastic flat and then through the loop again.


Finally the trickiest bit. Where the elastic threads behind the centre bar in the slider, pull it out so that it makes a loop standing away from the slider.

 This is so that you can then thread the loose end of the elastic over the bar as well .


Pull this through about an inch and then stick or sew it to hold it in place in the slider.

Just to clariy this picture the two outer pieces of elastic are the main band the inner two are where the loose end has been passed over the slider bar ready to glue or stitch in place.


The finished fully adjustable band

The bi fold elastic has a shiny and matt side, so it is easier to make sure that you glue wrong sides together at the loop and the slider. If your elastic is the same both sides just make a pen mark at each end of the side you are going to treat as the wrong side. It does help to prevent twisting the band.

 So all that is left is to glue or sew on your flower. I try on the band and position the loop and slider at the back of the head before attaching the flower and then I can see more accurately where I want the flower to sit.

Hope this is useful and you will make some lovely creations to dress up your party gear. As I said if anyone wants a how to for the melted rose I will post one if requested. I've included a picture below of one I made earlier so you can see what I am talking about.


Enjoy playing
TTFN
Jenny xx

Tuesday, 5 February 2013

BAG YOURSELF SOME VINTAGE STORAGE......A Tutorial....

Hi lovely sewers
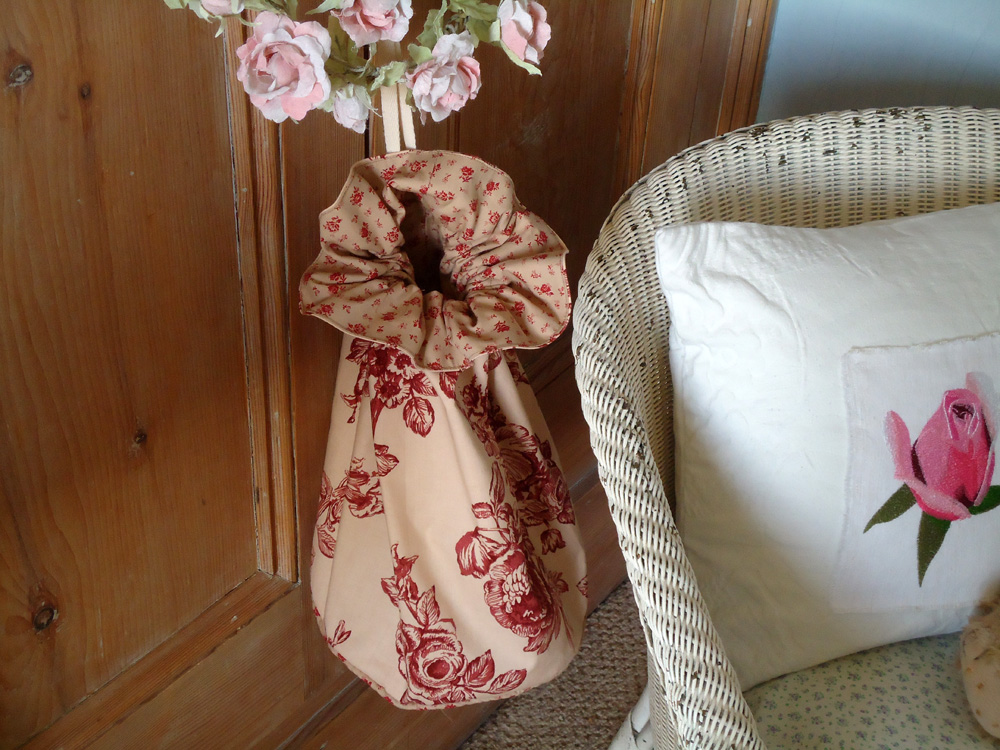
This week as well as churning out candy bunnies, I have been giving a bit of thought to the bedroom makeover. I have a walk in wardrobe, and in it storage baskets in a frame in which I keep all my lingerie and hose. However my socks and tights are fighting for space so I decided I could do with a drawstring bag to add to the storage and which could be hung decoratively on the built in cupboard doors.
So I chose a couple of pieces of the fabric I had already sorted as possibilities for the room, and set to.

This is how I did it....a little tutorial.....

You will need..

1/2 yard of cotton fabric, either medium furnishing weight or patchwork fabric for the outer layer
1/2 yard of a contrasting or toning cotton, similar weight. ( both about 45 inches wide ) for the lining.
3/4 yard to 1 yard  of piping cord.
1 yard cotton tape, ribbon or string.
Matching thread.


First find a template to draw a 10 inch circle. I could only find the base of a 9 inch cake tin so used that and added 1/2 inch all round for my seams. Starting at the edge of your fabric cut one circle out of each of your fabrics.
Cut a rectangle from each fabric 14 inches by 27 inches
Cut two strips from the lining fabric, one 28 inches by 1 1/2inches and the second 28 inches by 2 inches.


Take the 1 1/2 inch strip and fold in half along the length, wrong sides together. Take the piping cord and place it right up against the inside of the fold. Starting a couple of inches away from the end and using a zipper foot stitch as close as possible to the cord and continue to within 2 inches of the end of the cotton strip.


Take the circle cut from the outer fabric, and starting where your stitching began, carefully pin the corded strip around the outer edge of the circle keeping the cut edges matching. It is usual to have binding cut on the bias when using piping cord, but this does take rather a lot of fabric and as I was using some vintage fabric, I didn't want to waste any. For this project it worked OK, even though I did not snip into the curved seam, but I would not recommend this for anything on a bigger scale.
 

When you have pinned all around, again using the zipper foot carefully stitch the piped strip around the circle again starting and finishing where your original stitching on the tape began and ended. You should have a small amount that is not yet attached. This is where you cut the cord so that it meets flush and turn in one end of the tape and let it overlap the other end to give a neat join. Pin when done and finish stitching this portion.


Next take one of the rectangles and with right sides facing sew a half inch seam down the short sides, creating a tube. Do the same with the lining piece. Press the seams open.


Now you will join the outer tube to the already piped circle. With right sides facing pin the tube to the outer edge of the circle and again using your zipper foot stitch close to the piping.
Next with right sides facing join the lining tube to the lining circle in the same way, this time you need a 1/2 inch seam as there is no piping to sew against.


Having the outer bag piece inside out, and the lining bag piece the correct way, slide the lining inside the outer bag. The right sides should now be facing and the top of the bag pieces level.. Stitch around the top with a 1/2 inch seam leaving about 4 inches unsewn to turn the bag right sides out.  Pull both parts of the bag through this gap and then push the lining down inside the outer bag and press the top edge before top stitching all around closing the gap as you do.


Take the remaining 2 inch strip and fold it in half lengthwise with the right sides facing. Stitch the long edge with a 1/4 inch seam. Fasten both ends of your stitching securely as you will now turn this tube right side out. Press the tube with the seam centred at the back. Turn one short end in and neaten with hand stitching.


Now mark a line on the outer bag about 2 inches from the top all around. This is the placement line for the  casing you have just made. Pin the top of the casing under this line starting with the neatened edge about 1/4 inch away from the back seam, and finish the same distance from the other side, if necessary cut the casing to fit allowing about 1/4 inch to tuck in and neaten as you did at the beginning. Attach the casing by stitching close to both the top and bottom edges ensuring that you secure it well at both the start and end on each row of stitching as this is where you will thread your ribbon or tape to draw the bag closed.


Finally thread your tape through the casing and then either knot or neaten the ends before knotting them together and voila....


one useful drawstring bag for all manner of things....hosiery, hair equipment, face cloths in a bathroom...the uses are endless and the look too depending on your fabric choice. You could even use lightweight velvet and store your jewellery, or use fun 50s nursery prints and use as pyjama cases.

I would love to see your versions if you decide to have a go......

Must be wine o'clock by now so will bid you all goodnight and happy sewing.

TTFN
Jenny xx